|
Friends
This is my review of the book Programming the Raspberry Pi by Simon Monk, which I was given for my birthday a few weeks ago, and I have been reading, dipping into, over the last few weeks. I have had a Pi for a few months now and “play” when I have time. It is a book that one one hand is simple and easy to understand on the other gives glimpses of possibilities that make one want to go off and investigate. In my case I am interested in the automation and robotic possibilities of the Pi and Simon provides plenty of links to such things. Anyway I am digressing from the review. The subheading for the book is getting started with Python and the book goes through all the majority of basic areas of Python very briefly. He also introduces the Pygame library, and as with several of the concepts he mentions immediately recommends another book. This is good and bad. Good in so much as having wet ones appetite he gives guidance as to where to go next. Bad in so much this can be very frustrating. So the book is essentially a sign post pointing the direction to various things that can be done with a Raspberry Pi and saying that to follow up the majority of things mentioned there will probably be further reading, expense, and components required. This is probably obvious to anyone who knows anything about a Pi but not so to someone who does not and just wants to give a gift to a Pi owner. If one wants to read a Python Tutorial which goes into a bit more depth then Hands on Python Tutorial by Dr Andrew Harrington this is my review of one I read a couple of months ago and is more detailed than Simon's. So as the saying goes it does what it says on the tin, but this might not be understood, as to what this actually is. That being said I would recommended it to any budding Pi owner as it is not that expensive and does cover all the basic concepts. This was 14 week 11 fiction 12 (2 on audio) non fiction 2
0 Comments
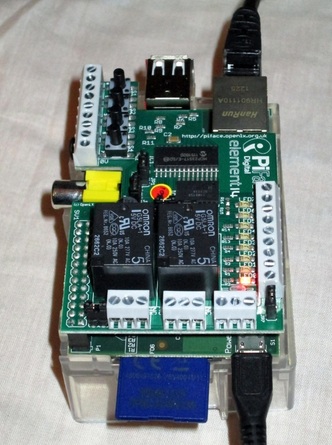 This year I got a very original Valentines day present – a PiFace for my Raspberry Pi. This is an interface board made by element 14, that sits on top of the Pi. Fortunately I had fairly recently updated the Pi operating system to the latest version of Raspbian wheezy, so knew I did not have that to do before installing the PiFace On opening the little box it came in there was the circuit board, and a leaflet that had health and safety info on it. Nothing else. Using a bit of initiative the board was fitted easily, making sure the Pi was turned off before fitting, though unfortunately it does not fit within the current plastic case, so will have to leave the top off. Then I suppose with not having any instructions I tuned the Pi on and vaguely hoped that it would see the board. Sadly this was not the case, spoilt by too many plug n play add ons. So had do some searching as to how to install the PiFace. (For ease of use I connect to my Pi via vncserver that I have preconfigured and set up. This allows me to connect to the Pi via a vnc viewer. I have ultravnc viewer http://www.uvnc.com/ on the laptop I am using for this.) I found some instructions here http://piface.openlx.org.uk/174770794 for the PiFace, but they have minor errors. Though minor they do stop things working, so with further investigation this is what I did to get it working sudo nano /etc/modprobe.d/raspi-blacklist.conf. (The install instructions miss off the leading slash (/), so if the file that appears is empty, you need to add the slash before editing it). Do a restart and then it is a good idea to make sure everything is up to date so run sudo apt-get update. Once everything is updated run wget http://pi.cs.man.ac.uk/download/install.txt Then I ran (This is slightly different form the official instructions, but that did not work for me) bash install.txt. This takes a long time to run, certainly more time than it took to go and boil the kettle and drink a cuppa. Fortunately it shows you that it is working as it writes to the screen all that it is doing and there are pages and pages of it. Once it had finished I did a restart for good measure. Then I ran the command piface/scripts/piface-emulator. 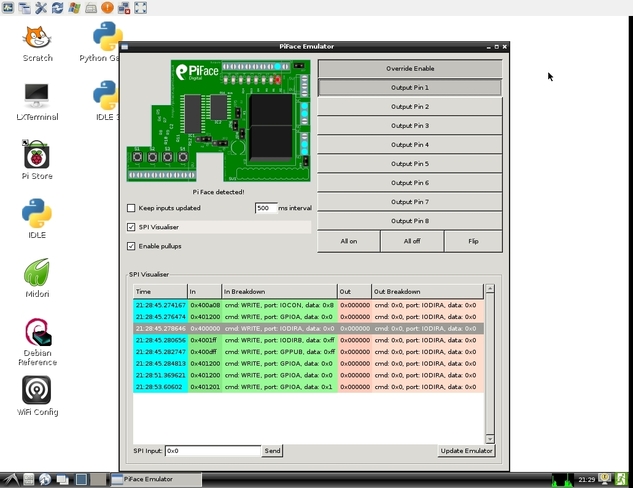 The emulator started and works fantastically well. To Control an output via the emulator Click Override Enable. Click Output Pin 1 to enable it. The PiFace interface will click as the relay turns on and the corresponding LED will illuminate. The screen updates to show the LED being on, the contacts have changed over on the relay and the first output pin is on. All the LEDs are in parallel with the outputs terminal connectors and indicate when the output is enabled. 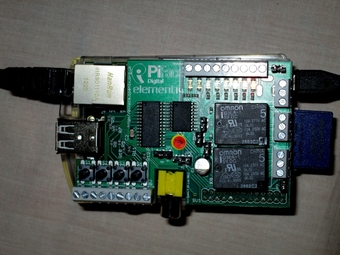 I then tried some simple Python commands – (Note I could only get this to work with Python 2 not Python 3)
To use Piface with Python import the piface.pfio module: import piface.pfio Then before use, the board must be initialised with a call to init() There are three main functions to control the interface digital_read(pin_number) - which returns 1 or 0 depending on the state of the input numbered pin_number digital_write(pin_number, state) - which sets the output numbered pin_number to state 0 or 1. State 1 turns the LED on and enables to open collector to sink current digital_write_pullup(pin_number, state) - which sets a 10k pullup on input numbered pin_number to be state 0 or 1. State 1 is pullup enabled Having got this far I was feeling quite pleased with myself, so thought I would try and get it working with Scratch – Mmmhhhmm!! Lots more searching on the web for some instructions which work, and sadly I have to say I did not find any. From opening the box to giving up with scratch it had taken around 5 hours. I did notice a comment from a dad on one site I looked at who had said he had spent most of the previous weekend trying to get the PiFace working with scratch with his son. He did say that he had eventually succeeded but it had taken more than 12 hours. It was a shame he did not say what he did. Still this is my challenge for this next weekend. Just under a year ago I put my name down for a Raspberry Pi, and was given a waiting list number of over 260,000. While I was waiting for my Pi to come, I looked around on the internet as to various things one could do with a Pi. Early on I noticed a blog article by someone talking about programming their arm to pick up a mince pie and give it to them, when they were having a cup of coffee. This was over Christmas 2011. I sort of vaguely mentioned this to Pauline, that it might be good fun to try and do when I got the Pi. Well the Pi came in the early autumn, followed by Christmas we have just had. There under the tree was a Robot Arm and usb interface. Quite a few hours later the arm was built – (33 pages of instructions), and was happily moving around with the manual control unit. This had to be uninstalled and the usb interface wired in. This is now quite a number of months since I saw the original blog item, and I could not find it again, but no worries as there seems to be at least 20 sites quoting the same bit of code on how to get it working. That should give a clue. It was late one evening between Christmas and New Year and I felt that I would like to get it working, and then work out how to change it afterwards. So I went onto one of the 20 plus sites, downloaded the code and tried to get it working. It would not work. Maybe time for bed The next day tried again, and still would not work. Ok so I thought maybe something on my Pi was conflicting with it. I had apache running at the time, so time for a new version. I downloaded the latest wheezy version http://www.raspberrypi.org/downloads, and wrote it to my sd card. While this was being done I thought I had better test my wiring just to make sure the Arm was working via the usb, so installed the software that came with it on a windows laptop and tested it. Yes it was working. So have set up the new card, installed tightvncserver on it so I can access it remotely (also this reduced the number of things going into the usb ports just in case they were causing the problem. We were ready for action. This time I was going to do it from first principles. 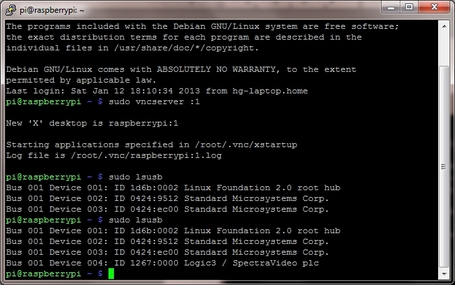 lsusb command results Firstly needed to check that the pi was picking up the arm via the usb hub. The easiest was of doing this is to use the command “sudo lsusb” in a terminal. (If the -v flag is used at the end then it is quite amazing the info it produces). The first time was with the arm turned off. The second time was when it was turned on So I could see that the arm had been detected as device 4 with an id of 1267. This is important as the id is needed by the program to talk to the arm. Next needed to install the usb library for python this is the version that I used. I saved it then, extracted it then ran into problems as the installation instructions say "python setup.py install". The Pi has two versions of python 2.7 and 3.2 Unfortunately the default one seems to be python 2.7, but this needs to be on the other version so when doing a python command need to add a 3 to the command. Probably there is a way of changing the default but I don't know it. 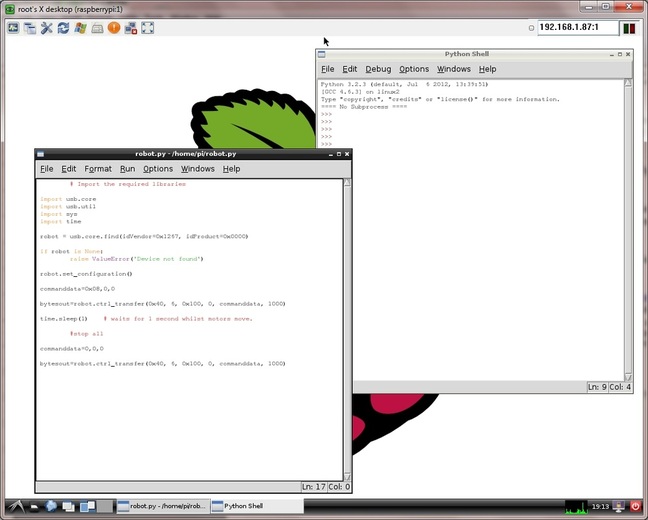
robot.py - Simple python program to move the arm.
The simple python code is as shown. This sends a single command at a time controlling the arm.
The byte commands are documented here http://notbrainsurgery.livejournal.com/38622.html It can either be run via the python GUI or as a terminal command line remembering to do it as a sudo command The byte data in the commanddata variable can be changed to move the arm. This way each movement and the corresponding byte data can be checked and tested. The next stage is to develop the program but that is for another day. I am not very good at recording non fiction in this book list. They tend to be books, or ebooks in this case, that I have open and read alongside other fiction books, but I thought I would record this book in my list as I have been reading it over the last few months.
I worked out the other day that I have been computer programming for almost 39 years, and as such in some respects feel a bit like a grandmother being told how to suck eggs, when I read some programming books. This was not the case with this book. For whatever reason Python seemed to have passed me by until earlier on in the year, when I got my Raspberry Pi. Having got that the next challenge was to run my usb robotic arm from the Raspberry Pi, and I decided to do that in Python. Rather than just did in there and get it working I thought it would be good to spend a bit of time learning some basics about the language. I looked/tried several tutorials and got very frustrated as either are so condescending, or simple as to not to be worth their time. I nearly gave up, but saw this tutorial mentioned on the Raspberry Pi forum http://www.raspberrypi.org/phpBB3/index.php The book is well structured and easy to follow, allowing one to skip through bits that you already know. The examples are reasonably interesting, and the challenges are not immediately answerable, in so much as they make one think. It is a book that is well worth spending time on if one wants to learn about Python and object oriented programming, though other may disagree as it does not immediately tell you how to program a game but takes one through the fundamentals of the language first. Of course the real question is – how did I get on with programming the robotic arm. Well friends you will have to wait for another post for that. This was this was book 49 week 33 fiction 45 (13 on audio) non fiction 4 |

Tim Fuller
Dyslexic doodles on photography, food (growing, cooking & of course eating), faith and other fascinating things. This is a personal blog expressing my views. Archives
November 2015
Categories
All
|
| Fullers Folio |
|
 RSS Feed
